Shower Waterproofing in Massachusetts: Why the Work Behind the Tile Matters
Shower Waterproofing: The Work You Don’t See Matters Most
When a newly remodeled shower is complete, homeowners see tile, grout, fixtures, glass, and carefully finished details.
What they don’t see may be even more important.
The waterproofing system is hidden behind those finished surfaces.
A shower is exposed to water every day. Building a durable shower therefore requires more than installing attractive tile.
The complete assembly needs to be prepared to manage moisture.
For homeowners in Middlesex County, Worcester County, Norfolk County, and the Greater Boston Area, understanding shower waterproofing can help explain why two bathroom remodeling proposals that look similar on the surface may represent very different scopes of work.
Tile Is Not the Entire Waterproofing System
This is one of the most important concepts homeowners should understand.
Tile is a durable finish material commonly used in wet areas.
Grout fills the joints between tiles.
But the shower needs an appropriate water-management strategy behind and beneath the visible finishes.
The exact system depends on the installation, materials, manufacturer requirements, and project conditions.
Why Showers Need Special Protection
Unlike many other rooms, shower surfaces are repeatedly exposed to water.
Potentially vulnerable areas include:
- Shower walls
- Corners
- Floor
- Drain
- Plumbing penetrations
- Niches
- Benches
- Transitions
A well-designed system treats these areas as connected components.
Waterproofing Begins With Preparation
Before waterproofing material is installed, the underlying surfaces need to be appropriate for the system.
Preparation can involve evaluating:
- Wall surfaces
- Floor conditions
- Corners
- Openings
- Plumbing locations
- Drain location
- Niche construction
The finished waterproofing can only perform as intended when the underlying assembly is properly prepared.
Corners and Transitions Matter
Large uninterrupted wall surfaces are not necessarily the most complicated parts of a shower.
Transitions deserve particular attention.
Examples include:
- Wall-to-wall corners
- Wall-to-floor transitions
- Niche corners
- Plumbing penetrations
- Shower entrance
- Drain area
These are places where different planes and components meet.
The Shower Niche Is Part of the Waterproofing System
A niche creates several additional surfaces inside the shower wall.
Instead of one continuous wall, there are now:
- Side walls
- Back surface
- Upper transition
- Lower surface
- Multiple corners
This is why a shower niche needs to be incorporated into the waterproofing strategy rather than simply cut into the wall during tile installation.
Plumbing Penetrations Need Attention
Every fixture that passes through the shower wall creates an interruption.
Examples include:
- Shower controls
- Showerheads
- Handheld connections
- Body sprays
These penetrations need to coordinate with the wall and waterproofing system.
The Shower Floor Is Equally Important
Water needs to move toward the drain.
That requires coordination between the shower floor geometry, waterproofing, drainage system, and finished tile.
A beautiful shower floor that does not manage water properly is not a successful installation.
Waterproofing vs. Finished Tile
| Behind the Tile | What Homeowners See |
|---|---|
| Prepared substrate | Finished tile |
| Waterproofing | Grout joints |
| Protected transitions | Clean corners |
| Drain integration | Decorative drain |
| Sealed penetrations | Shower fixtures |
| Waterproofed niche | Storage shelf |
The right side creates the appearance.
The left side helps support long-term performance.
Why Documentation During Construction Is Valuable
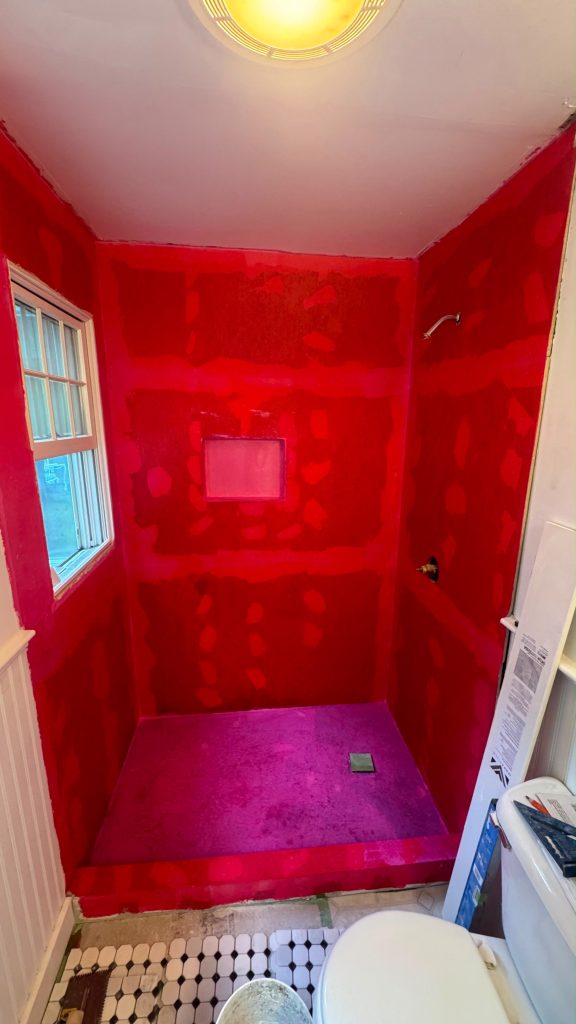
This is where the real Ronie Construction photographs become particularly useful.
Once tile is installed, homeowners can no longer see the waterproofing underneath.
Photographing the construction process documents that stage before it disappears.
It also helps homeowners understand that a bathroom remodel involves far more work than what appears in the final before-and-after photograph.
Real Ronie Construction Project
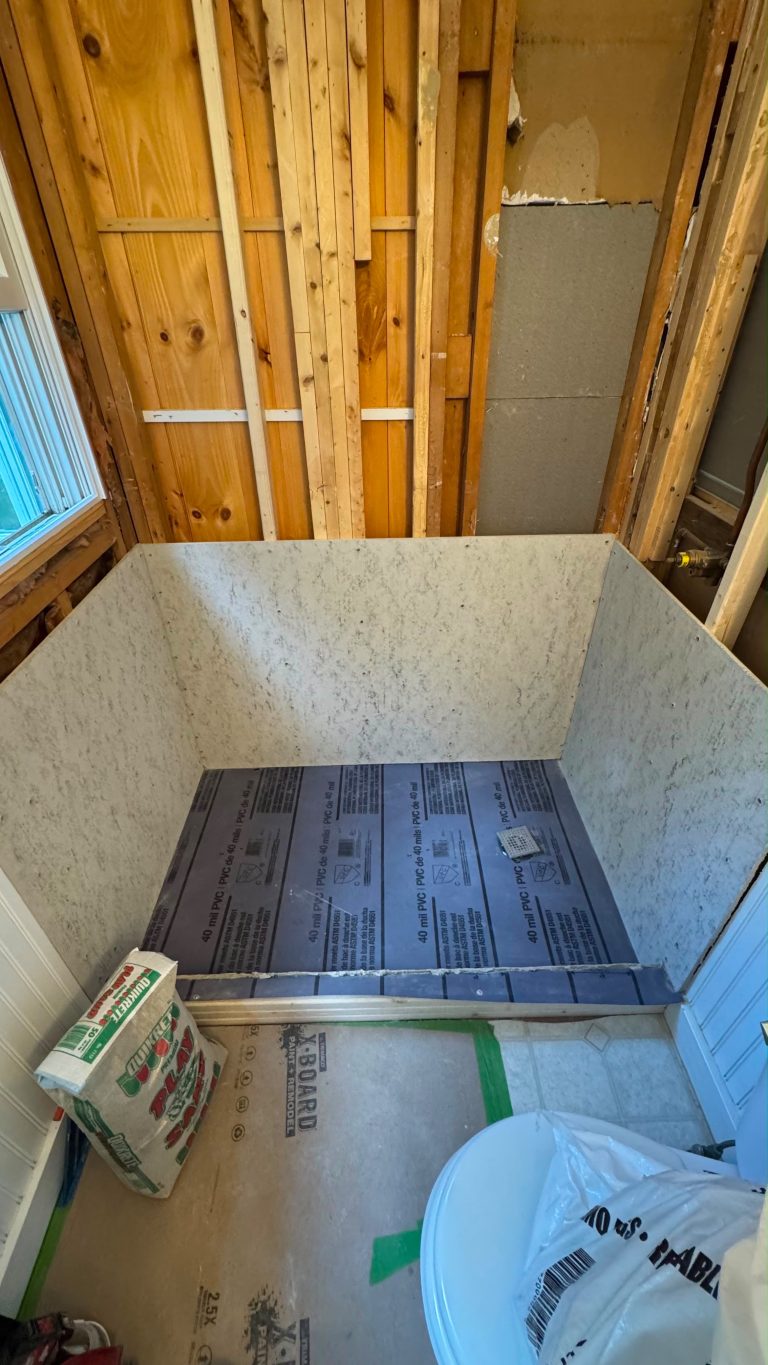
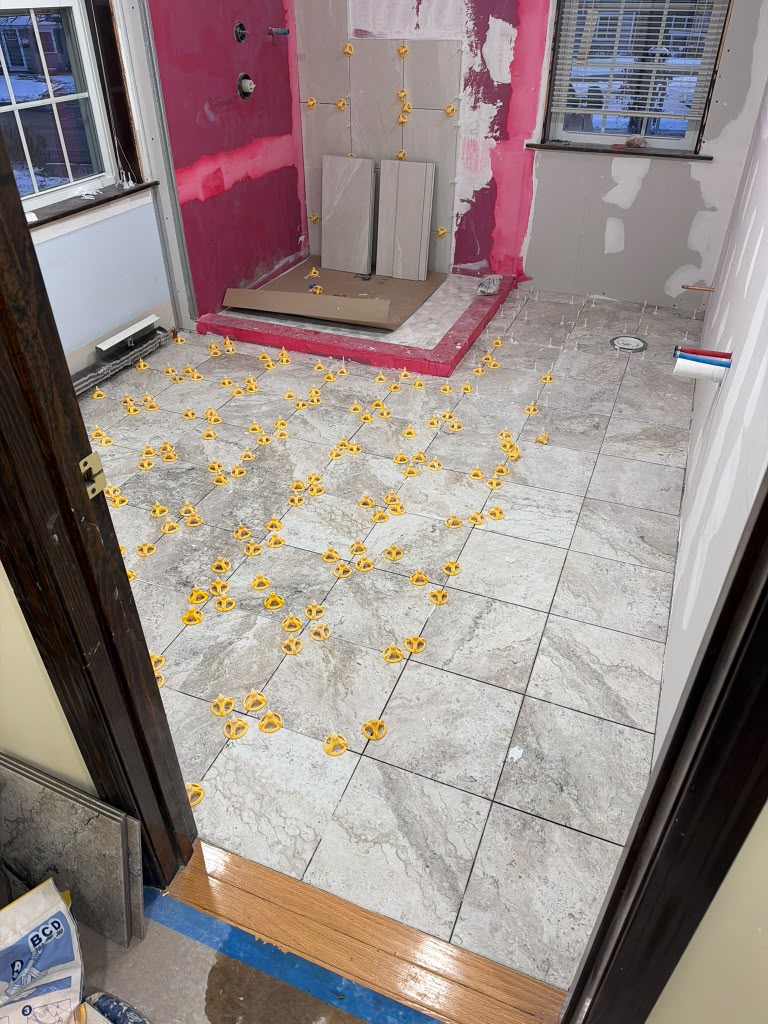
The project images featured in this article show an actual Ronie Construction bathroom renovation during the waterproofing and tile-preparation stages.
The bright waterproofing material visible across the shower walls makes the normally hidden layer easy to understand.
Later photographs of the same type of project show what happens next:
waterproofing disappears → tile is installed → fixtures go in → glass is installed → bathroom is finished.
That sequence demonstrates an important principle:
Quality remodeling begins before the beautiful finishes appear.
What Can Happen When Water Reaches the Wrong Places?
Moisture reaching building materials outside the intended wet-area system can potentially contribute to:
- Deterioration
- Damaged finishes
- Staining
- Unwanted moisture
- Repairs to surrounding materials
The goal of professional shower construction is to manage water before these conditions develop.
Why Older Massachusetts Bathrooms Can Be More Complicated
Older homes may contain previous bathroom renovations completed with different materials or methods.
Once demolition begins, contractors may discover:
- Previous moisture damage
- Older plumbing
- Uneven walls
- Subfloor deterioration
- Previous patches
- Outdated construction
These conditions need to be evaluated before rebuilding the shower.
Questions to Ask Your Bathroom Contractor
Instead of asking only which tile will be installed, homeowners should also ask:
- What waterproofing system will be used?
- How will the shower floor be constructed?
- How will the drain integrate with the system?
- How will the niche be waterproofed?
- How are plumbing penetrations handled?
- What preparation is required before tile?
These questions reveal much more about the proposed construction process.
Why the Hidden Work Matters
Professional bathroom remodeling requires understanding both finishes and the construction beneath them.
Ronie Construction performs bathroom renovations throughout Middlesex County, Worcester County, Norfolk County, and Greater Boston, including preparation, waterproofing, tile installation, fixtures, and finishing.
Real construction photography demonstrates this process far better than a stock image of a completed bathroom.
Final Thoughts
When evaluating a shower remodel, don’t focus only on the tile.
Ask what is going behind it.
Once the bathroom is finished, the waterproofing system disappears from view—but it continues doing its job every time the shower is used.
The best-looking part of a bathroom may be the tile.
Some of the most important work is underneath it.
FAQs
Is shower tile waterproof?
Tile is a finish material. A properly constructed shower should include an appropriate water-management system behind or beneath the finished surfaces.
Does a shower niche need waterproofing?
The niche should be integrated into the shower’s overall waterproofing strategy because it creates additional corners and transitions within the wet area.
Does waterproofing go underneath bathroom tile?
Wet-area assemblies typically include a water-management system coordinated with the substrate and tile installation. The exact method depends on the selected system.
Can an existing shower be waterproofed without removing tile?
If the problem originates behind an existing tile assembly, accessing and properly correcting it may require removal. The actual condition needs professional evaluation.
Why does the shower floor need to slope?
The floor needs to direct water toward the drain rather than allowing it to remain in unintended areas.
How can I know my shower was waterproofed?
Discuss the system with your contractor before installation and consider documenting construction stages before tile covers the waterproofing.
A Beautiful Shower Starts Behind the Tile.
👉 Ronie Construction handles the details you see—and the critical work you won’t see once your bathroom is finished.
📞 (781) 420-2049
🔗 https://ronieconstruction.com/contact/