Bathroom Remodel Before & After: Inside a Real Massachusetts Renovation
Bathroom Remodel Before & After: What Goes Into a Complete Transformation
The finished bathroom is what everyone notices.
Beautiful tile.
A clean glass enclosure.
Modern fixtures.
A custom shower.
But those finishing touches are only the final stage of a much larger remodeling process.
Behind every well-executed bathroom renovation are layers of planning, preparation, waterproofing, tile work, plumbing coordination, and careful installation.
The photographs featured in this article document a real Ronie Construction bathroom remodeling project, allowing us to show homeowners something that traditional before-and-after photography often misses:
what happens in between.
For homeowners throughout Middlesex County, Worcester County, Norfolk County, and the Greater Boston Area, understanding this process can make planning a bathroom renovation much easier.
A Bathroom Remodel Is More Than a Cosmetic Upgrade
It is easy to think about bathroom remodeling primarily in terms of finishes.
Homeowners often begin by thinking about:
- Tile colors
- Fixtures
- Shower glass
- Vanity design
- Faucets
- Lighting
These decisions matter.
But bathrooms are also highly technical spaces.
They combine:
- Water
- Plumbing
- Electrical systems
- Waterproofing
- Drainage
- Flooring
- Wall systems
- Ventilation
- Finish materials
The finished bathroom needs to look beautiful and function properly.
Stage 1 — Planning the New Bathroom
Before demolition begins, the project should establish what needs to change.
Questions may include:
- Will the shower remain in the same location?
- Is the shower becoming larger?
- Will plumbing fixtures move?
- What type of tile will be installed?
- Is a recessed niche being added?
- What type of shower enclosure will be used?
- Will lighting change?
- Is the floor being replaced?
- Are walls being modified?
Planning these elements together helps reduce conflicts later in the project.
Stage 2 — Demolition Reveals the Existing Conditions
Once old finishes are removed, the contractor can see conditions that were previously hidden.
Depending on the property, demolition may reveal:
- Previous repairs
- Water damage
- Plumbing conditions
- Subfloor problems
- Wall irregularities
- Older construction methods
This stage can be especially important in older Massachusetts homes.
A remodeling project needs to respond to the house that actually exists—not simply the design shown on paper.
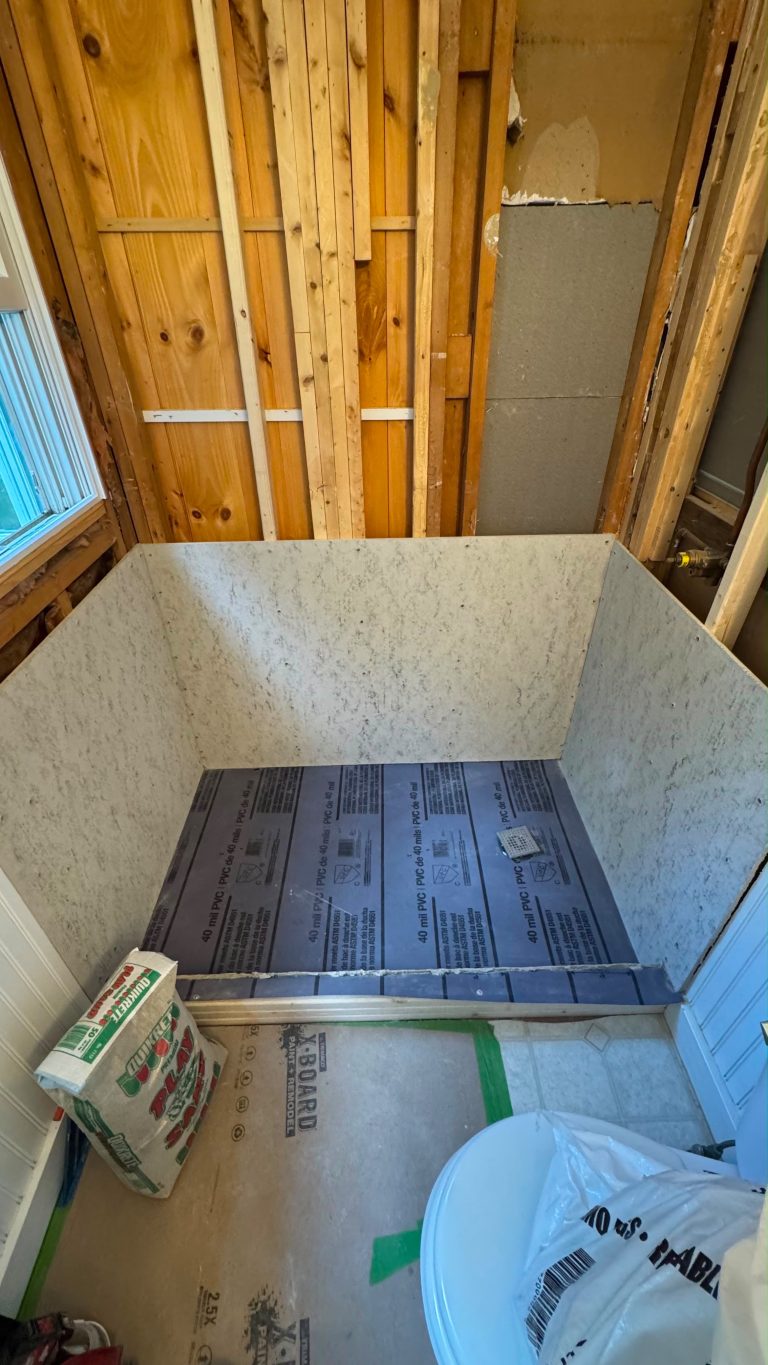
Stage 3 — Preparing the Shower Area
This is where your project photography becomes particularly valuable.
The construction images show the shower before the finished wall tile and glass enclosure hide the work underneath.
The shower area needs to be properly prepared for the materials that will follow.
Attention needs to be given to:
- Wall surfaces
- Corners
- Plumbing penetrations
- Shower base
- Drain
- Recessed niche
- Transitions
Stage 4 — Waterproofing: The Part You Won’t See Later
Once a bathroom is finished, waterproofing disappears.
That doesn’t make it less important.
In fact, it makes documenting this stage especially useful.
Why Waterproofing Matters
Tile and grout are visible finish materials.
The shower assembly underneath needs to be designed to manage moisture appropriately.
Critical areas include:
- Corners
- Shower base
- Wall transitions
- Plumbing penetrations
- Niches
- Drain connections
This is one of the clearest examples of why homeowners should evaluate remodeling quality based on more than the final photograph.
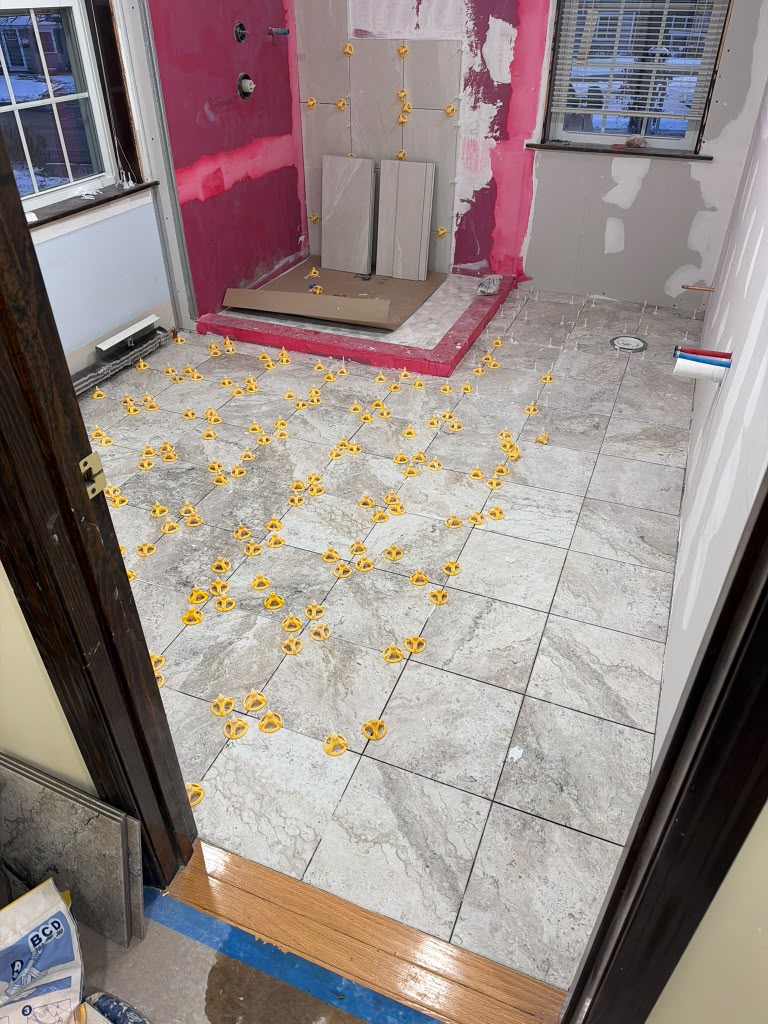
Stage 5 — Tile Layout and Installation
Tile can completely define the visual character of a bathroom.
But installation quality is just as important as tile selection.
Your project photographs show the use of tile leveling and spacing components during installation, which provides an excellent opportunity to explain the craftsmanship involved.
Tile installation requires attention to:
- Layout
- Alignment
- Spacing
- Cuts
- Corners
- Transitions
- Leveling
- Grout joints
Why Tile Layout Should Be Planned Before Installation
Imagine reaching the opposite wall and discovering that the final row requires an awkwardly narrow strip of tile.
Good planning can help avoid visual problems like this.
Contractors need to consider:
- Room dimensions
- Tile dimensions
- Shower openings
- Niches
- Plumbing fixtures
- Doors
- Visible focal points
The goal is to make the finished installation look intentional.
Stage 6 — Building the Shower Niche
A recessed shower niche may look like a simple shelf when the bathroom is complete.
During construction, however, it becomes part of the wall and waterproofing system.
The niche needs to coordinate with:
- Wall construction
- Waterproofing
- Tile layout
- Depth
- Location
- Surrounding fixtures
When planned properly, it adds useful storage without introducing a bulky accessory into the shower.
Stage 7 — Shower Floor and Drainage
The shower floor has a different job from the rest of the bathroom floor.
It needs to direct water toward the drain while providing a finished walking surface.
Smaller-format or mosaic tile is commonly used in shower floors because it can accommodate the geometry of the sloped surface.
In this project, the finished shower floor creates a visual contrast with the larger wall tile while supporting the overall drainage design.
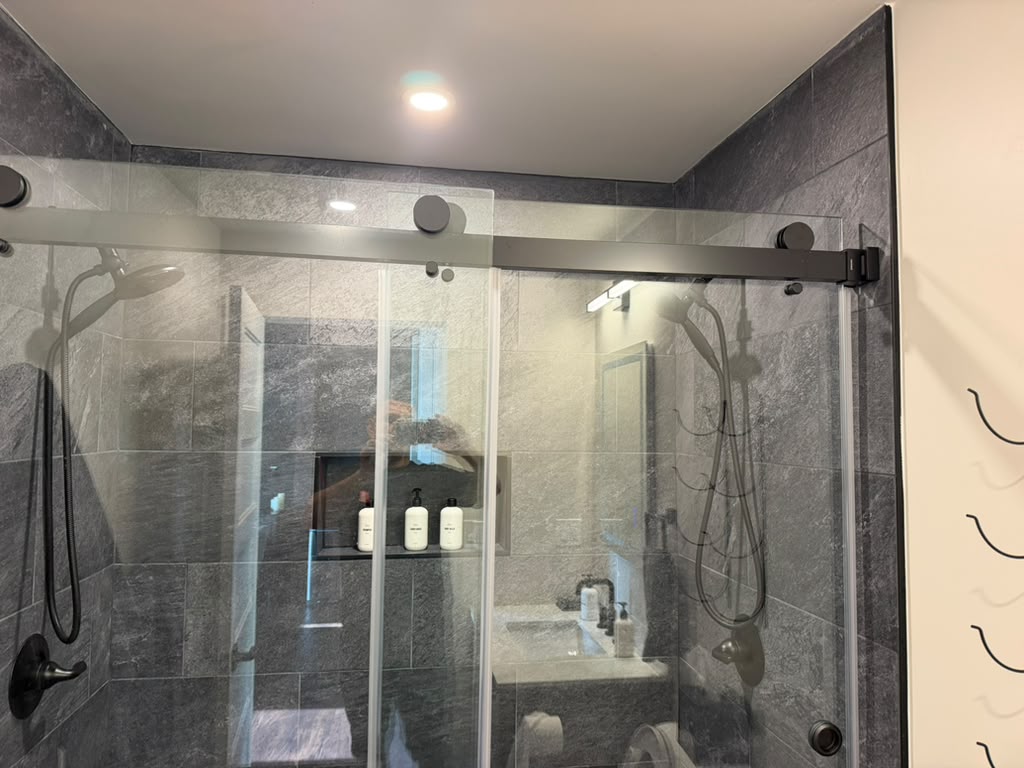
Stage 8 — Installing the Glass Enclosure
Once the tile work is complete, the glass enclosure dramatically changes the appearance of the bathroom.
Clear glass can help:
- Showcase the tile
- Maintain visual openness
- Make the bathroom feel larger
- Allow natural and artificial light to move through the space
The project photographs show how dramatically the room changes once this final element is installed.
Construction Stage vs. Finished Bathroom
| During Construction | Finished Result |
|---|---|
| Exposed preparation | Clean tiled surfaces |
| Waterproofing visible | Waterproofing hidden |
| Tile leveling components | Consistent grout joints |
| Open shower area | Glass enclosure |
| Plumbing penetrations | Finished fixtures |
| Construction materials | Functional bathroom |
And this comparison highlights something important:
the finished result depends on everything that happened before it.
Real Ronie Construction Project
Unlike a stock photo of a perfect bathroom, the images accompanying this article show the actual remodeling process.
They document the transformation from active construction to the finished shower.
This allows homeowners to see:
Preparation → Waterproofing → Tile Installation → Detail Work → Finished Bathroom
That process is a much better representation of remodeling craftsmanship than a finished photo alone.
Remodeling Bathrooms in Massachusetts Homes
Homes throughout Greater Boston, Middlesex County, Worcester County, and Norfolk County vary significantly in age, layout, and construction.
Bathroom renovations in older properties may uncover unexpected conditions after demolition begins.
These can involve:
- Plumbing
- Electrical
- Framing
- Subfloor
- Previous renovations
- Moisture-related damage
Professional remodeling requires the ability to adapt the plan when existing conditions demand it.
What Should Homeowners Prioritize?
When planning a bathroom renovation, prioritize:
Function
Does the layout work for everyday life?
Water Management
Is the shower assembly being properly constructed?
Materials
Are materials appropriate for the location?
Installation
Are tile and fixtures being installed carefully?
Long-Term Use
Will the bathroom still meet your needs several years from now?
A beautiful design is important—but it should be supported by good construction.
Bathroom Remodeling Investment
Bathroom remodeling costs vary according to:
- Bathroom size
- Demolition
- Tile selection
- Shower design
- Plumbing changes
- Electrical work
- Vanity
- Fixtures
- Glass
- Existing conditions
- Finish level
Instead of comparing projects solely by total price, homeowners should compare the scope of work.
Two bathrooms that look similar in a photograph can involve very different levels of preparation and construction.
Showing the Work Behind the Finished Result
One of the advantages of using real project photography is transparency.
Homeowners can see more than a polished final bathroom.
They can see actual construction taking place.
Ronie Construction provides bathroom remodeling and broader construction services throughout Middlesex County, Worcester County, Norfolk County, and the Greater Boston Area.
This project demonstrates the importance of treating a bathroom as a complete construction system—from preparation through finishing.
Final Thoughts
A successful bathroom remodel is not created when the glass shower door goes in.
It begins much earlier.
It starts with planning.
Then preparation.
Then waterproofing.
Then careful tile installation.
Then finishing details.
The final bathroom is simply the visible result of all those stages working together.
When choosing a remodeling contractor, don’t look only at finished photographs.
Ask to see the process behind them.
FAQs
What is included in a complete bathroom remodel?
Depending on the project, work can include demolition, plumbing, electrical, waterproofing, tile, flooring, fixtures, vanity installation, painting, shower glass, and finishing.
Is waterproofing necessary behind shower tile?
A properly designed shower requires a water-management system appropriate for the installation. Tile alone should not be considered the complete waterproofing strategy.
How long does a bathroom remodel take?
The timeline depends on the scope, materials, existing conditions, inspections, plumbing and electrical changes, tile work, and custom components.
What is a recessed shower niche?
It is a storage area constructed within the shower wall for products such as shampoo and soap.
Why are smaller tiles often used on shower floors?
Smaller tiles can better accommodate the slope and geometry required to direct water toward the drain.
Can an older Massachusetts bathroom be completely remodeled?
Yes. Older homes can be remodeled successfully, although demolition may reveal existing conditions that need to be addressed as part of the project.
Ready to Transform Your Bathroom?
A beautiful bathroom starts with quality work long before the final finishes are installed.
👉 From preparation and waterproofing to tile, fixtures, and the finished shower, Ronie Construction can manage your complete bathroom renovation.
📞 (781) 420-2049
🔗 https://ronieconstruction.com/contact/