What Happens After Bathroom Demolition? The Remodeling Process Explained
What Happens After Bathroom Demolition? Understanding the Rebuilding Process
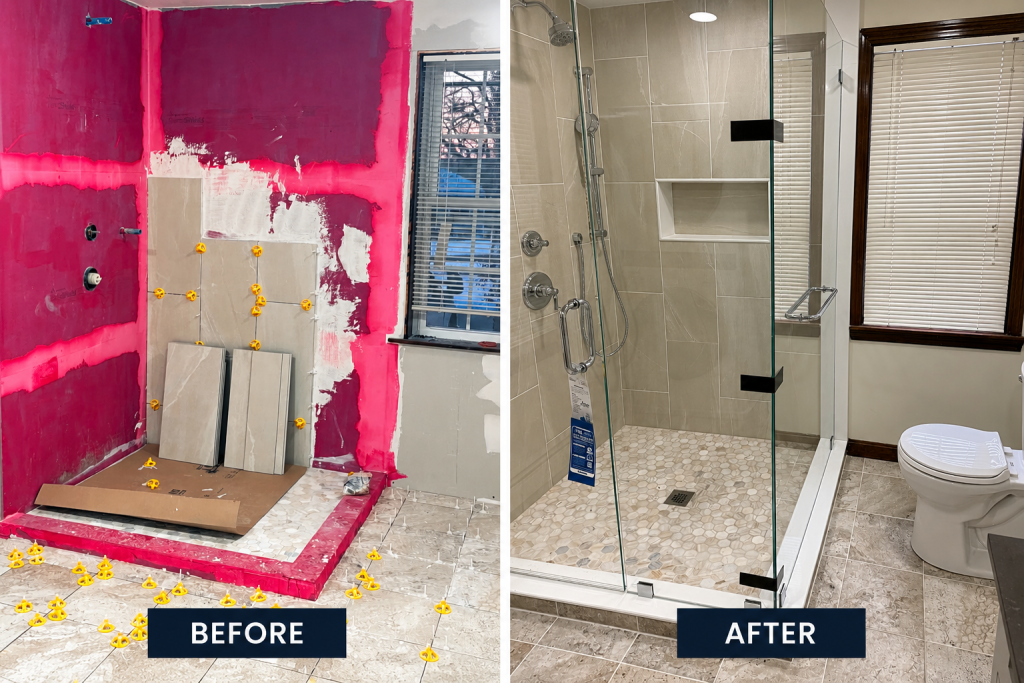
Before-and-after photos make remodeling look almost instantaneous.
Old bathroom → Beautiful new bathroom.
But between those two photographs is where most of the actual work happens.
After demolition, a bathroom can look dramatically worse before it starts looking better.
- Walls may be open.
- Plumbing may be exposed.
- Flooring may be removed.
- Fixtures disappear.
- Framing becomes visible.
To a homeowner seeing their bathroom in this condition, the room can look chaotic.
To an experienced remodeling team, however, this stage provides something extremely valuable: access.
It is the point where existing conditions can be evaluated and the new bathroom can begin to be built correctly from the inside out.
Demolition Is More Than Tearing Things Out
Professional demolition is not simply destroying the existing bathroom as quickly as possible.
The objective is to remove what needs to be removed while understanding what remains.
Depending on the project, demolition can expose:
- Wall framing
- Subfloor
- Plumbing
- Electrical wiring
- Previous repairs
- Water damage
- Insulation
- Older construction methods
This information can affect what happens next.
Why Existing Conditions Matter
Before demolition, many parts of a bathroom are hidden.
Tile hides the wall assembly.
Flooring hides the subfloor.
Vanities conceal plumbing.
Walls conceal electrical and plumbing systems.
Once those materials are removed, the contractor can see conditions that may not have been visible during the initial planning stage.
This is especially relevant in older Massachusetts homes.
Stage 1: Evaluate What Demolition Reveals
Before rushing into reconstruction, the exposed room should be evaluated.
Questions may include:
- Is the framing in appropriate condition?
- Is there evidence of previous moisture?
- What is the condition of the subfloor?
- Does the plumbing match expectations?
- Are previous renovations visible?
- Does the planned layout still work with the actual conditions?
If an issue is discovered, this is generally the time to address it.
Covering a known problem with new finishes does not make it disappear.
Stage 2: Framing and Layout Changes
If the bathroom design involves changing walls, openings, niches, or other constructed features, framing may be required.
This can establish the physical shape of the new room.
Framing can affect:
- Shower dimensions
- Niches
- Door openings
- Wall locations
- Vanity area
- Storage
- Other architectural features
Precision at this stage matters because finished surfaces will follow the structure underneath.
Stage 3: Plumbing Work
Bathrooms contain multiple plumbing fixtures.
Depending on the project, this may include:
- Shower
- Tub
- Toilet
- Vanity
- Sink
- Drain
- Shower controls
- Handheld shower
- Additional fixtures
If fixture locations are changing, plumbing work may need to occur while the walls and floor are accessible.
This is one reason major layout decisions should be finalized before reconstruction advances too far.
Stage 4: Electrical and Lighting
Bathroom remodeling can also involve electrical work.
Possible changes include:
- Lighting
- Vanity lighting
- Receptacles
- Exhaust fan
- Heated flooring
- Switches
- Other electrical components
Electrical planning should be coordinated with the finished layout.
For example, moving a vanity can affect where lighting and electrical components should be located.
Stage 5: Inspections When Applicable
Depending on the scope of the project and local requirements, certain work may require permits and inspections.
This is why project sequence matters.
Work that needs to remain accessible for inspection should not be prematurely covered by finished walls.
Permitting requirements depend on the actual scope and jurisdiction.
Stage 6: Close the Walls
Once required rough work is complete and the project is ready to advance, walls and surfaces can begin moving toward their finished condition.
But shower areas require special attention.
A wet area is not simply another painted wall.
The assembly needs to be appropriate for the intended application.
Stage 7: Shower Preparation and Waterproofing
This is one of the most important stages in a shower remodel.
Before beautiful tile appears, the shower needs appropriate preparation and water management.
This can involve attention to:
- Walls
- Corners
- Shower floor
- Drain
- Niches
- Plumbing penetrations
- Transitions
Much of this work disappears once tile is installed.
That does not make it less important.
In many ways, it makes documentation even more valuable.
Stage 8: Floor Preparation
The bathroom floor also needs to be ready for the selected finish.
Depending on the project, this stage may involve:
- Subfloor evaluation
- Surface preparation
- Heating system installation
- Underlayment or compatible installation system
- Layout planning
A beautiful tile floor depends heavily on what exists underneath it.
Stage 9: Tile Installation
Now the project finally begins looking more like the finished bathroom.
Tile installation requires decisions involving:
- Layout
- Alignment
- Spacing
- Cuts
- Corners
- Niches
- Floor transitions
- Shower drain
- Grout joints
This is one of the stages where craftsmanship becomes highly visible.
Bathroom Remodeling: Visible vs. Hidden Work
| Hidden During Finished Project | Visible When Complete |
|---|---|
| Framing | Finished walls |
| Plumbing rough-in | Faucets and fixtures |
| Electrical rough-in | Lighting and controls |
| Shower waterproofing | Shower tile |
| Floor preparation | Finished flooring |
| Heating system | Warm tile floor |
| Substrate preparation | Clean tile installation |
The right-hand column gets photographed.
The left-hand column helps make it possible.
Stage 10: Fixtures and Finish Work
As construction progresses, the room starts coming together.
Depending on the project, finishing may include:
- Vanity
- Sink
- Toilet
- Faucets
- Shower fixtures
- Lighting
- Mirrors
- Trim
- Paint
- Accessories
The bathroom finally begins to resemble the design homeowners imagined at the beginning.
Stage 11: Glass Shower Enclosure
For custom showers, glass is often one of the final major visual elements.
The enclosure needs to coordinate with:
- Shower dimensions
- Tile
- Entry
- Hardware
- Fixtures
Once installed, it can dramatically change how open and finished the room feels.
Why Construction Order Matters
Imagine installing tile before necessary work behind the wall is complete.
Or finishing a floor before a required component underneath it has been installed.
Construction activities depend on each other.
A simplified sequence might look like:
Demolition → Evaluation → Framing → Rough Trades → Inspections → Wall Preparation → Waterproofing → Flooring/Tile → Fixtures → Glass → Finish Work
The exact order varies according to the project, but sequencing is essential.
What Can Be Discovered During Demolition?
Older homes can contain surprises.
Examples may include:
- Previous water intrusion
- Damaged subfloor
- Older plumbing
- Unusual framing
- Multiple layers of previous flooring
- Previous repairs
- Uneven walls
Professional remodeling requires evaluating these discoveries rather than pretending they aren’t there.
Why Real Construction Photos Matter
The image accompanying this article is particularly useful because it does not show the glamorous finished bathroom.
It shows the project while construction is underway.
That provides homeowners with a much more realistic understanding of remodeling.
A quality renovation isn’t simply the final tile and glass.
It’s the entire process that came before them.
Real Ronie Construction Project
The photograph featured here comes from an actual Ronie Construction remodeling project.
This type of documentation demonstrates real work at a stage homeowners rarely see in advertising.
Ronie Construction performs remodeling and residential construction throughout Middlesex County, Worcester County, Norfolk County, and the Greater Boston Area.
The Finished Bathroom Starts Behind the Walls
Experienced remodeling involves understanding how different trades interact.
Framing affects tile.
Plumbing affects fixtures.
Electrical planning affects lighting.
Waterproofing affects shower construction.
Floor preparation affects tile.
The project should therefore be managed as a complete system rather than a collection of unrelated finishing tasks.
Final Thoughts
Bathroom remodeling isn’t:
Before → After.
It’s:
Before → Demolition → Evaluation → Construction → Rough Work → Preparation → Waterproofing → Tile → Fixtures → Finishing → After.
The middle stages may not be beautiful.
But they are where much of the quality of the final bathroom is determined.
So when looking at a beautiful finished shower, remember:
The work you can no longer see is often just as important as the work you can.
FAQs
What happens first after bathroom demolition?
The exposed conditions are evaluated before reconstruction continues. Framing, plumbing, electrical systems, subfloor conditions, and other components may become visible.
How long does a complete bathroom remodel take?
Timelines vary according to project scope, existing conditions, materials, inspections, custom components, and other construction requirements.
What problems can demolition reveal?
It may expose previous moisture damage, subfloor issues, older plumbing, unusual framing, or earlier repairs.
When is shower waterproofing installed?
Waterproofing is incorporated during shower preparation before the finished tile installation, according to the selected construction system.
When is shower glass installed?
Custom glass is generally coordinated later in the project after the shower surfaces and dimensions are ready for the enclosure.
Why should construction stages be photographed?
Photographs can document important work that will eventually be hidden by tile, walls, flooring, and other finished materials.
A Beautiful Bathroom Is Built From the Inside Out.
From demolition and preparation to waterproofing, tile, fixtures, and finishing, every stage matters.
Talk to Ronie Construction about your next bathroom remodeling project.
📞 (781) 420-2049
🔗 https://ronieconstruction.com/contact/